

By James R. Arnold & Ralph R. Reinertsen
80 pages. Thirteen scenarios provide historical contexts for challenging and fun games. Fourteen maps and thirty-one illustrations. Available as an electronic publication. PDF download for $9.95.
Battles for Empire: Why Napoleonics?
The Napoleonic era offers the wargamer a compelling challenge because the Napoleonic battlefield witnessed a balance among the three arms—infantry, cavalry, and artillery—never equaled during other military periods. The tabletop general who best handles the interplay between the three arms will duplicate the era’s successful generals. Keep in mind Napoleon’s observation: “Of the three arms—cavalry, infantry, and artillery—none must be despised. All three are equally important.” A historical officer or a tabletop general who fights his three arms in the coordinated manner of the ‘Iron’ Marshal Davout, the gallant Marshal Lannes, or the aggressive Russian General Bagration is an exceptional commander indeed. We hope that these scenarios offer the opportunity to showcase your skills while having fun and perhaps learning a thing or two about our favorite gaming era.
Now Available – Single wargame scenarios for only $2.00 apiece. Find out more about our first offering.
Choose Your Rules!
Your rules may not be ours: Different? Yes; Better? Whatever, no problem. This scenario booklet strives to appeal to the Napoleonic gamer regardless of his choice of rules. Toward that goal we offer explanations and examples to provide as seamless as possible a transition from the orders of battle in this booklet to your gaming table.
Each scenario has the following elements
- Historical Narrative: the battle’s historical context
- Order of Battle: a list of the troops you need to fight the scenario
- Skirmishers: identification of which troops, if any, may fight in skirmish order
- Special Rules: rules unique to this scenario
- Table Top Map: how to arrange your gaming table
- Terrain Notes: the gaming implications of the terrain features
- Setup: where the rival sides may deploy their troops
- Time: the historical amount of time the battle lasted
- Victory Conditions: how to assess who has won the fight
- Gamer’s Notes: our view of why this scenario is compelling
Scenario Overview
Our scenarios provide a historical context for challenging and fun games. Three are associated with the 1807 Eylau Campaign. Spoiling Attack: Bernadotte at Mohrungen features a French assault designed to cover the assembly of Napoleon’s army. In this nail-biting encounter, the Russian player must defend his ground and then evade nimbly before the jaws of Bernadotte’s trap close. Bagration’s Rear Guard takes place on the eve of Eylau and pits one of the Russian army’s finest combat leaders against an impetuous French pursuit. With darkness looming, time is of the essence as the intrepid, some would say rash, Marshal Joachim Murat hurls his forces against Bagration’s well-chosen blocking position. Flank Attack! brings Marshal Davout’s veteran infantry onto the flank of the main Russian army at Eylau. Napoleon’s entire plan of campaign hinges on what Davout can accomplish, but unfortunately the gifted marshal must make headway against a tenacious defender who enjoys a tremendous numerical advantage in cavalry. Von Plötz’s Honor allows the gamer to restore tarnished Prussian prestige under daunting if not desperate circumstances at the Battle of Braunsberg. Kamenski Rolls the Dice: The Relief of Danzig finds the young Russian General Nikolay Kamenski, recently promoted for his conduct at Eylau, trying to break the French siege lines at Danzig. Supported by the Royal Navy, Kamenski has the opportunity to attack an outnumbered French and French-allied force, but he must hurry to get the job done before French reinforcements reach the field. On To Berlin!, the only hypothetical scenario from this lot, is carefully based on real allied plans designed to divert French forces from Poland. It is a ‘what if?’ scenario that brings to the table a unique blend of British, Prussian, and Swedish fighting forces pitted against Marshal Mortier’s corps of French and French allies. Both sides are playing for high stakes: if the coalition partners succeed, then nothing stands before them and Berlin. If they fail, the coalition is certain to dissolve.
Five scenarios focus on the 1809 Austrian Campaign. The action begins with Ridgetop Battle, a collision between Davout’s superb veterans and highly motivated Austrians along the Teugen-Hausen ridge. This encounter may well vindicate the saying attributed to Napoleon, “May the last battalion decide the issue.” Next comes Assault on the Bettel Berg, the first phase of the Battle of Eckmühl. Here the combat focuses on possession of a commanding height that is the linchpin of the Austrian defense. Napoleon, eager to unleash his main attack, watches impatiently as the French and Bavarians advance against this formidable position. In Train Raid, it is the Austrians’ turn to display their dash in a hypothetical raid behind French lines. Based on an actual series of actions against Napoleon’s lines of communication, the raid brings Andreas Hofer’s Tyrolean guerrillas down from their alpine lair to join Austrian regulars in a surprise attack against a French convoy. Lannes’ Last Charge covers Napoleon’s desperate attempt to defeat the Austrians on the second day of the Battle of Aspern-Essling. On this field the Emperor entrusted Marshal Lannes with the task of advancing across fire-swept terrain in order to pierce the Austrian center and convert defeat into victory. Battle of Raab takes us to Hungary where Eugène Beauharnais commands a multicorps attack against a stubbornly defended Austrian position centered around the fortified farm complex of the Kis-Megyer. This combat will surely remind gamers of the struggle for Hougoumont at Waterloo! However, compared to Waterloo, the battlefield at Raab offers more options for grand tactical maneuver thus giving both French and Austrian commanders a stern combined arms examination. The last 1809 scenario, Invasion at Cadzand, brings the British ashore at Walcheren as they attempt to open a second front against Napoleon. Lord Huntly must eliminate the Breskens coast defense batteries that protect the entrance to Antwerp and are located on the island of Cadzand. Defending the batteries is an unusual collection of conscripts, militia, dock workers, Irish and Prussian mercenaries, and Dutch regulars.
Lastly, Pour le Mérite brings us full circle back to October 17, 1806. It is a remarkable skirmish action during which the Prussian Lieutenant Karl von Hellwig and a chosen band of volunteer hussars ambushed a French column and liberated thousands of Prussian prisoners. While delving through European archives, Ralph discovered an old annotated map detailing Hellwig’s ambush and we simply could not resist offering it as a ‘beer and pretzels’ skirmish action to cap off our scenario booklet and hopefully your evening of enjoyable gaming.
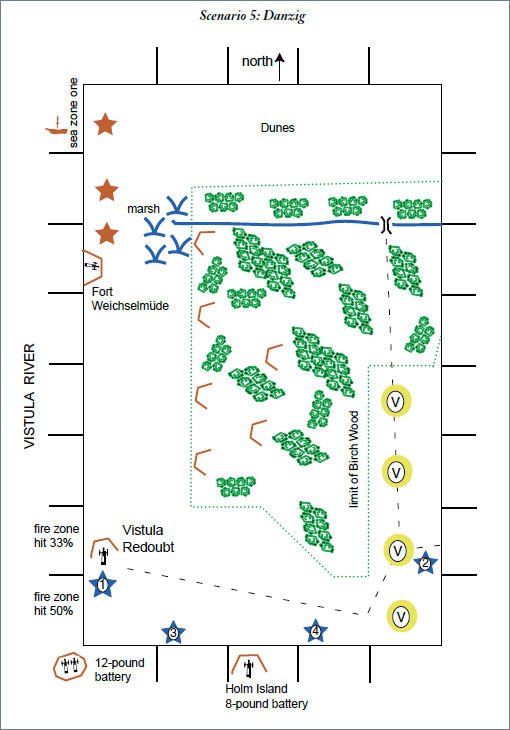
Scenario 5: Danzig
Allied Order of Battle: Count Nikolay Kamenski II
|
||
| 4 a.m. General Kamenski (average)
Brigade of Light Troops General Loptev (average) 21st Jäger Regiment Colonel Kulikovski schützen company (Prussian, from the garrison) |
three btns at 275 (825) at 50 |
V8 R8 |
| Infantry Brigade General Arsenyev (average)
Navagin Musketeer Regiment Tobol Musketeer Regiment Colonel Schröder |
three btns at 275 (825) three btns at 300 (900) |
R7 R7 |
| Infantry Brigade General Leontyev
Mohilve Musketeer Regiment Polotsk Musketeer Regiment Colonel Popov |
three btns at 300 (900) three btns at 300 (900) |
R7 R7 |
| Russian corps troops
Archangel Musketeer Regiment Colonel Berlizeev 1st Pioneer Company 20th Pioneer Company cossack regiment |
three btns at 275 (825) at 50 at 50 five sqds at 75 (375) |
R7 V8 V8 M7 |
| Prussian Brigade Major-General Michael Szabginsky von Rembow
Fusilier battalion Nr. 23 Major von Schachtmeyet Infantry Regiment Nr. 14 General von Besser Dragoon Regiment Nr. 5 field battery |
at 600 one btn at 600 one sqd at 125 four 6-pound cannon |
R8 R7 R8 R7 |
British ships:
|
||
Allied Skirmish Capacity: The Russian jäger battalion and the Prussian fusilier battalion may deploy one company as skirmishers. If that company is destroyed, the battalion may send out another company to skirmish. The Prussian schützen company may skirmish.
Special Russian Artillery Rule: All Russian infantry regiments have six 6-pound regimental cannon. They must operate with their parent infantry formation; either in pairs of guns assigned to each battalion or massed as a six-gun battery. In gaming terms, this means the bases with the regimental cannon models must always be touching the parent infantry bases. Should the infantry lose a firefight or close combat and be forced to retreat or rout, the infantry abandons its regimental cannon and the cannon are removed from the game. Regimental cannon fire only in support of the infantry to which they are attached. In other words, unlike other artillery, they do not fire at targets of opportunity. They have limited ammunition and may fire ball twice and canister twice.
Special Fort Weichselmüde Rule: a fixed Prussian 12-pound field battery may fire from the redoubt shown on the map against targets within twenty inches of the redoubt.
Special Royal Navy Rule: The Russian player selects either the Dauntless or the Falcon to support his attack. The Dauntless’s carronades were short-range weapons with the broadside equivalent in terms of range and effect of a 12-pound battery firing canister. The Dauntless can absorb four hits before sinking. The Falcon has the broadside equivalent of an 8-pound field battery and can absorb three hits before sinking. The selected ship starts the game at sea zone 1. It may move two feet up or down the river each turn and fire a broadside once per turn.