
Back in Print!
By James R. Arnold & Ralph R. Reinertsen
Hardcover: 470 pages
Publisher: Napoleon Books (2007)
ISBN-10: 0967098513
ISBN-13: 978-0967098517
Product Dimensions: 6.3 x 1.4 x 9.4 inches
$60.00 plus postage
The autumn of 1806 witnessed one of history’s foremost military geniuses, Napoleon Bonaparte, at the apogee of his power. After easily defeating the vaunted Prussian army, the Emperor Napoleon occupied Berlin. The scale of his victories stunned Europe. He and his veteran warriors appeared invincible.
Undaunted, the young Tsar Alexander sent his armies westward to confront the French. The ensuing collisions took place in Poland, one of Europe’s poorest, most barren regions. Terrain, weather, and luck played critical roles. Then came a seemingly implausible reversal of fortune when an inexperienced Russian army, riven by command dissension, inflicted a pair of severe checks at Pultusk and Golymin. Napoleon’s opponents rejoiced to see the ‘Corsican Ogre’ falter as he retired to winter quarters to lick his wounds. The Russian armies were not done. Flush with his success at Pultusk, Russian General Leontii Bennigsen assumed overall command of the tsar’s forces and launched a surprise offensive. It compelled Napoleon to abandon winter quarters and begin a grueling campaign. Napoleon’s brilliantly conceived strategic envelopment miscarried. A five-day all-out pursuit finally brought the Russians to bay on the snow covered ground of Eylau. Here over 140,000 French and Russian soldiers fought a terrible battle. They displayed surpassing courage and moments of inspired leadership, and committed costly blunders as victory trembled in the balance. The battle inflicted nearly 60,000 casualties, leaving thousands of dead and wounded littering the exposed slopes as frozen darkness descended. Then and thereafter, both sides claimed victory, but what was absolutely clear was that for the first time in his career Napoleon had met a foe capable of resisting his sweeping strategic thrusts and tactical flourishes.
Using primary sources gleaned from libraries and archives in Europe and the United States, Crisis in the Snows removes the shroud of Napoleon’s propaganda to portray the demoralizing reality of the winter campaign in Poland. Napoleon’s Grande Armée is revealed not as a smoothly oiled machine but rather a war-weary force whose soldiers doubted that France’s security required a march into Poland. Yet, when summoned to battle by a man who possessed a unique capacity to inspire French self-sacrifice, Napoleon’s soldiers repeatedly displayed prodigies of valor.
Previous accounts have relied upon German historians whose goal was to rewrite the history of Prussia’s inglorious 1806 collapse, Bennigsen’s self-admiring memoirs, or British propagandists. Russia’s warriors have passed into history as walking muskets; stupid, inflexible, but brave and led by inept officers. Crisis in the Snows gives voice to the Russian experience during a pivotal campaign and portrays a very different reality.
Well illustrated with portraits, drawings, paintings and maps, and supplemented with detailed appendices on the strengths and composition of the rival forces, Crisis in the Snows provides a novel interpretation of the 1806-1807 campaign that foreshadows the well-known disaster of 1812.
470 pages including 37 maps, 53 illustrations and 8 appendices
Table of Contents
- Chapter I. A Tale of Two Murders
- Part 1. To Kill a Tsar
- Part 2. Death of a Duke
- Part 3. Dateline to War
- Chapter II. Napoleon Moves East
- Part 1. The Three Front War
- Part 2. Advance to the Oder
- Chapter III. The Napoleonic War Machine
- Part 1. Tactical Combat in the Napoleonic Era
- Part 2. The Grande Armée
- Chapter IV. The Russian War Machine
- Part 1. An Army of Serfs
- Part 2. The Organization of the Russian Army
- Chapter V. High Strategy
- Part 1. Russia Moves West
- Part 2. Decision at Osterode
- Part 3. The “Slope to Ruin”: The Berlin Decrees
- Chapter VI. A Matter of Command
- Part 1. Delay on the Vistula
- Part 2. The Tsar Chooses a General
- Part 3. A New French Offensive
- Chapter VII. The French Offensive Begins
- Part 1. Night Crossing
- Part 2. The Narew River Outposts
- Chapter VIII. The Fog of War
- Part 1. The Pursuit Continues
- Part 2. The Battle of Golymin
- Chapter IX. The Battle of Pultusk
- Part 1. Bennigsen Stands His Ground
- Part 2. The Mud of Pultusk
- Part 3. The Tenth Legion Arrives
- Chapter X. Affairs of State
- Part 1. Warsaw Interlude
- Chapter XI. The Russian Winter Offensive
- Part 1. The Wanderings of Marshal Ney
- Part 2. Bennigsen’s Missed Opportunities
- Chapter XII. Bennigsen’s Fighting Retreat
- Part 1. A Purloined Letter
- Part 2. Night and Day
- Part 3. The Combat of Hoff
- Chapter XIII. The Penultimate Day
- Part 1. Bagration’s Rearguard
- Part 2. The Fight for Eylau
- Chapter XIV. Crisis in the Snows
- Part 1. “Hurricane of Death”
- Part 2. Pinning Attack
- Part 3. Murat’s Epic Charge
- Part 4. Riders of the Imperial Guard
- Chapter XV. Eylau Afternoon
- Part 1. Flank Attack
- Part 2. On the Brink of Victory
- Part 3. The Prussians Save the Day
- Chapter XVI. “A Massacre Without Results”
- Part 1. Retreat
- Part 2. “Like a Black Hell”
- Chapter XVII. Blame and Circumstance
- Part 1. The Cost of Battle
- Part 2. Assessment
- Appendix I. The Calculation of Strengths
- Appendix II. Russian Army Composition and Organization
- Appendix III. French Army Composition and Organization
- Appendix IV. Battle of Golymin Orders of Battle
- Appendix V. Battle of Pultusk Orders of Battle
- Appendix VI. Battle of Eylau Orders of Battle
- Appendix VII. The Battle of the Maps
- Appendix VIII. Logistics in Poland
Detailed Orders of Battle
For the true buffs, we provide forty-six pages of appendices complete with army composition and organization and orders of battle. From Appendix II, Russian and Prussian Army Composition and Organization, pages 406-407:
Third Division - Lt-General Fabian Vilgelmovich, Baron Osten-Sacken I |
||||||
|
Brigade of Major-General, Count von der Pahlen III
|
||||||
|
Brigade of General Titov IInd
|
||||||
|
Brigade of General, Prince Dolgorukov V
|
||||||
|
Brigade of Lieutenant General Brizeman von Netting
|
||||||
|
Brigade of artillery - 76 pieces - Colonel Beil
|
||||||
Detailed Maps
The Fog of War: Eylau Dawn
Military history books require good maps. Among our thirty-seven maps are grand tactical depictions so you can see the battlefield as perceived by the rival commanders. Generals on both sides made decisions based on incomplete information. Their ability to cope with the ‘Fog of War’ helped determine a battle’s outcome.
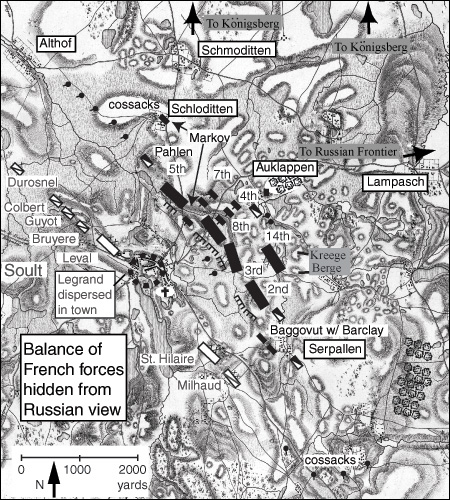
On page 271, Map 23 Russian Initial Dispositions, Eylau Dawn, February 8, 1807, we see how Bennigsen’s perception of French dispositions influenced his deployment. Only those French units that Bennigsen could see are shown. Based on what he could see, Bennigsen concluded that Napoleon intended to attack his right in order to drive a wedge between the Russian army and the Prussians who were operating to the northwest. Accordingly, Bennigsen weighted his defense on his right.
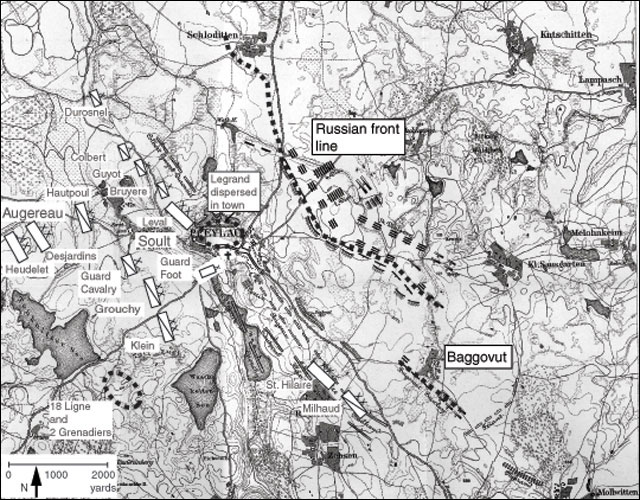
On page 277, Map 25 French Initial Dispositions, Eylau Dawn, February 8, 1807, we see Napoleon’s actual dispositions. Contrary to Bennigsen’s assessment, Napoleon planned to shift Augereau’s VII Corps to the French right-center to conduct a pinning attack against the Russian left. This attack was supposed to commence when Davout entered the field from the southeast to make a battle-winning grand tactical envelopment of the Russian flank.
In the event, the battle did not proceed according to either general’s intentions.
The Strategic
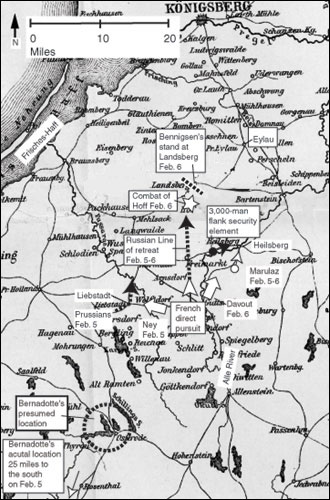
We provide thirty-seven maps so you can follow the strategic situation as perceived by the rival commanders. Both Napoleon and Bennigsen had to make decisions based on incomplete and often misleading intelligence. This ‘Fog of War’ hugely influenced the campaign’s outcome.
On page 233, Map 17 Napoleon’s Pursuit, February 5-6, 1807, we see Napoleon’s strategic scheme and how his mistaken notion of the location of Bernadotte’s I Corps affected his plans.
The Tactical
Many of our maps depict the unfolding tactical situation at the regimental level. In addition, we explain and evaluate French and Russian combat tactics.
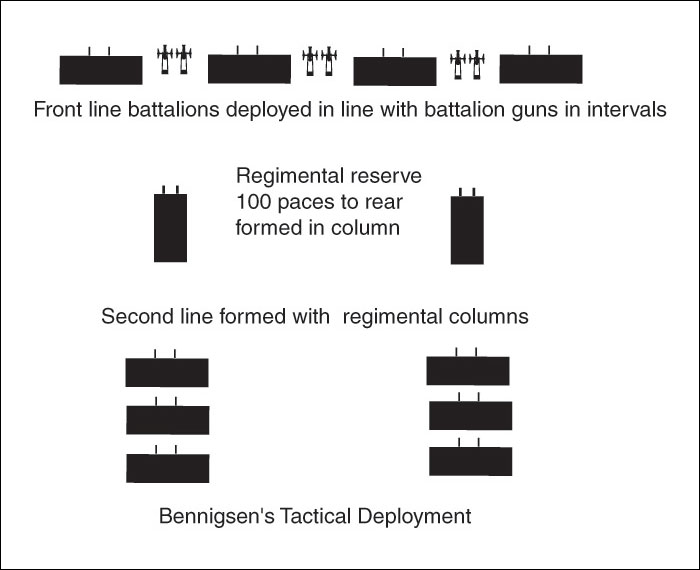
On page 273, Map 24 Bennigsen’s Tactical Deployment, we see Bennigsen’s novel tactical scheme to thwart a French infantry assault. The regiments closest to the French deployed two battalions in line. One hundred paces behind them stood the third battalions formed in column. Their task was to seal any breaches by a quick counterattack. The regiments in the second line provided Bennigsen with part of his ‘strong reserves at hand’. They formed in regimental columns of battalions (each battalion deployed in line, one behind the other). This formation had two advantages. If the French infantry defeated all the front units, they would still face a fresh battalion deployed in a defensive formation.